Sharp MX-7500N Uživatelský manuál Strana 14

  • Stažení
  • Přidat do mých příruček
  • Tisk
  • Strana
    / 30
  • Tabulka s obsahem
  • KNIHY
  • Hodnocené. / 5. Na základě hodnocení zákazníků
Zobrazit stránku 13
14
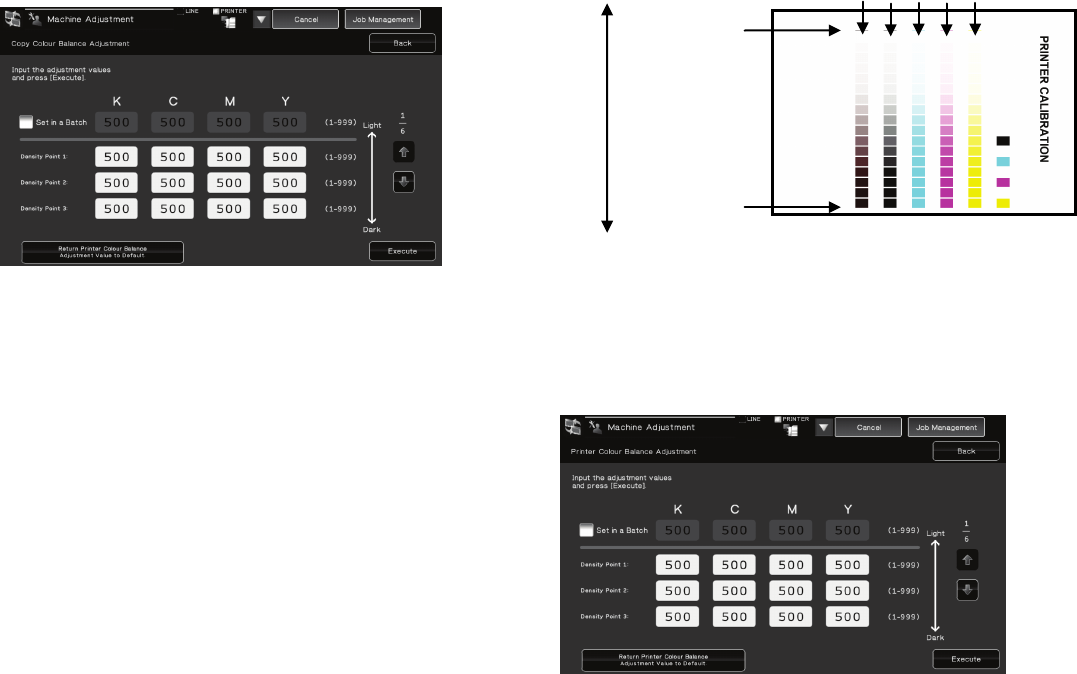
4) Referring to the adjustment pattern, select the colour
and density point to adjust. Enter the desired value and
then tap the [Execute] key.
Example of the Copy Colour Balance Adjustment screen
Note:
It is recommended to change adjustment value to 450
or 550 at first.
To change the density points separately
The density points can be specified separately.
Input range: [1] to [999]
Default: [500] for each
To change all density points at once
The density points can be also specified all at once
by
checking the [Set in a Batch] checkbox.
Input range: [1] to [999]
The [Set in a Batch] checkbox is not checked by default.
When this checkbox is checked, the value [500]
appears in the textbox.
Note:
When the [Set in a Batch] checkbox is checked,
Density Points 1-17 are greyed out. When this
checkbox is not checked, the textbox for [Set in a
Batch] is not active. (A beep sounds when the textbox
is tapped.)
5)
After adjustment, tap the [Execute] button again, print
a print pattern, and check the results of adjustment.
You will return to the Image Quality Adjustment
screen.
Note:
To return your preferences to the factory defaults, tap
the [Return Copy Colour Balance Adjustment Value to
Default.] key. When a confirmation message appears,
tap the [OK] key. Your preferences are returned to the
factory defaults and the screen returns to the Image
Quality Adjustment screen.
1.5.2 Printer Colour Balance Adjustment
This enables adjustment of gradation density for printing in
printer mode by measuring test patch visually.
1) Select [Printer Colour Balance Adjustment] in the
Image Quality Adjustment screen.
2) To start the adjustment, tap the [Execute] key in the
Printer Colour Balance Adjustment screen.
3) An adjustment pattern is printed.
4) Referring to the adjustment pattern, select the colour
and density point to adjust. Enter the desired value and
then tap the [Execute] key.
Example of the Printer Colour Balance Adjustment screen
Note:
It is recommended to change adjustment value to 450
to 550 at first.
To change the density points separately
The density points can be specified separately.
Input range: [1] to [999]
Default: [500] for each
To change all density points at once
The density points can be also specified all at once
by
checking the [Set in a Batch] checkbox.
Input range: [1] to [999]
The [Set in a Batch] checkbox is not checked by default.
When this checkbox is checked, the value [500]
appears in the textbox.
Note:
When the [Set in a Batch] checkbox is checked,
Density Points 1-17 are greyed out. When this
checkbox is not checked, the textbox for [Set in a
Batch] is not active. (A beep sounds when the textbox
is tapped.)
Low density
High density
mix
Density Point 1
Density Point 17
…………………
Zobrazit stránku 13
1 2 ... 9 10 11 12 13 14 15 16 17 18 19 ... 29 30

Komentáře k této Příručce

Žádné komentáře